
Designing a custom heatsink for an AI server involves several key considerations to ensure optimal thermal performance, reliability, and compatibility with the server's hardware. Following is a step-by-step guide to help you design a custom heatsink.
1. Understand the Requirements
● Thermal Load: Determine the heat dissipation requirements (in watts) of the AI server's components (e.g., CPUs, GPUs, TPUs, or other accelerators).
● Space Constraints: Measure the available space for the heatsink, including height, width, and depth.
● Airflow: Consider the server's cooling system (e.g., fans, liquid cooling) and airflow patterns.
● Material: Choose materials with high thermal conductivity, such as aluminum or copper.
● Mounting Mechanism: Ensure compatibility with the server's mounting system (e.g., screws, clips, or thermal adhesive).
2. Thermal Analysis
● Use thermal simulation software (e.g., ANSYS, SolidWorks Thermal, or COMSOL) to model heat dissipation and airflow.
● Calculate the required thermal resistance of the heatsink using the formula:
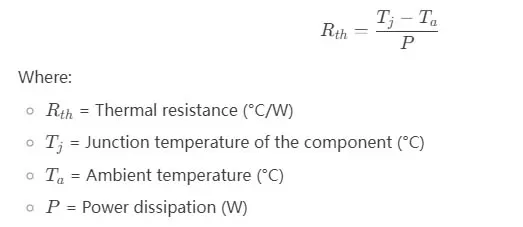
3. Design the Heatsink
Base Plate: Design a thick base plate to spread heat evenly.
Fins: Optimize fin geometry (height, thickness, and spacing) to maximize surface area while minimizing airflow resistance.
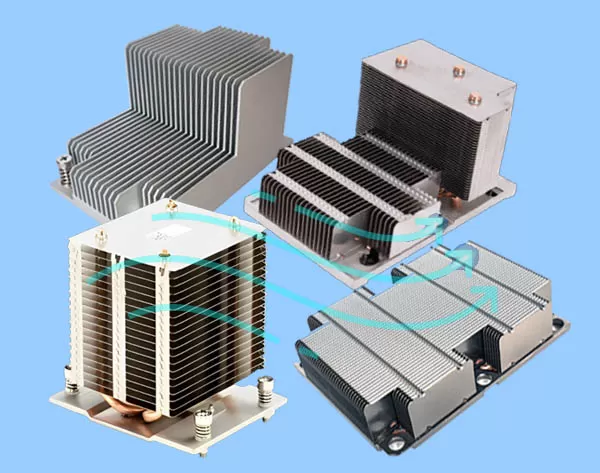
Heat Pipes: Incorporate heat pipes for efficient heat transfer from the base to the fins.
Vapor Chamber: For high-performance applications, consider using a vapor chamber for even heat distribution.
Surface Finish: Use anodized or nickel-plated finishes to improve durability and thermal performance.
4. Prototype and Testing
Create a prototype using CNC machining or 3D printing (for initial testing).
Test the heatsink in a controlled environment to measure its thermal performance.
Use thermal imaging cameras and thermocouples to monitor temperature distribution.
5. Optimization
Adjust fin density, height, and base thickness based on test results.
Consider adding features like turbulence-inducing patterns or staggered fins to improve airflow.
6. Manufacturing
Choose a manufacturing method based on volume and complexity:
Extrusion: Cost-effective for simple designs.
CNC Machining: For high-precision, custom designs.
Die Casting: For large-scale production.
Additive Manufacturing: For complex geometries.
7. Integration
Ensure the heatsink fits seamlessly into the AI server chassis.
Use high-quality thermal interface materials (TIMs) to minimize thermal resistance between the heatsink and the component.
8. Compliance and Certification
Ensure the heatsink meets industry standards for thermal performance, safety, and reliability.
Test for vibration, shock, and long-term durability.
Example Specifications for an AI Server Heatsink
● Material: Copper base with aluminum fins.
● Dimensions: 150mm x 150mm x 50mm.
● Thermal Resistance: <0.1°C/W.
● Mounting: Screw-mounted with spring-loaded screws for even pressure distribution.
● Cooling: Compatible with server fans (e.g., 40mm or 80mm fans).
By following these steps, you can design a custom heatsink tailored to the specific needs of your AI server, ensuring efficient cooling and reliable operation.
 +86-18902844286
 E-mail
